Chapter 3. Installation
- Table of Contents
- 3.1. Documentation
- 3.2. The layout of a NetBSD installation
- 3.3. Installation
- 3.4. Installation example
3.1. Documentation
The documentation of NetBSD is mostly in the format for manual pages and makes up an excellent technical reference to the system. I won't deny that it is unsuited as a tutorial (not to mention the fact that you can't read it until you install NetBSD); these are the reasons for the existence of this guide.
Note: as a matter of fact you could read the man pages through the web interface, but I don't think it is a practical way to learn the system...
After installation you will find some BSD guides in the /usr/share/doc directory. They are divided in three main sections, psd (UNIX Programmer's Supplementary Documents), smm (UNIX System Manager's Manual) and usd (UNIX User's Supplementary Documents). You can read the text on the terminal with, for example:
$ cd /usr/share/doc/smm/09.sendmail
$ nroff -me 09.sendmail/intro.me | more
or you can generate Postscript output using the makefiles.It's undeniable that there is a lack of HOWTOs and for this reason you should make the most of the existing ones; the NetBSD release contains some documents in text format and on the NetBSD web site you can find further information and FAQ's.
Original documentation: the NetBSD site contains several pages with documentation and HOWTOs both generic and platform specific. This information is well written and usually easy to understand; for example you can find:
how to access a DOS/Windows partition from NetBSD
how to start NetBSD from the Windows NT boot loader
...
All the versions of NetBSD contain the following files:
- INSTALL
installation notes. This is the most important document and you should read (and reread it) carefully; it contains a description of the NetBSD system, a list of the supported hardware and, most notably, the installation instructions.
- README.first
you should also read this.
- release.man
describes the structure of the NetBSD release you are installing. It is a text file in man layout: it is preformatted and you can read it with any editor.
On the NetBSD web site you can find, amongst the others, the following guides:
- NetBSD FAQ
general information and pointers to other FAQ.
- NetBSD/i386 FAQ
NetBSD/i386 specific FAQ.
- Basic NetBSD Networking
Guide to network and PPP configuration.
3.2. The layout of a NetBSD installation
The layout of the files of a NetBSD installation is described in the aforementioned INSTALL file. For example, for the i386 platform the system binaries are in the i386/binary/sets directory and the sources are in the source/sets directory. The source/patches directory contains patches to the base release which usually fix bugs or security related problems discovered after the release.
3.3. Installation
The first thing to do before installing NetBSD is to read the release information and installation notes in the INSTALL file: this is the official description of the installation procedure. Next you should decide the installation media that you will use; you can choose between:
| ftp |
| nfs |
| CDROM |
| floppy |
| filesystem |
| local directory |
3.3.1. Keyboard
sysinst will not allow you to change the keyboard layout during the installation: if you use a US keyboard it's OK, but for the rest of the world it's a minor annoyance, though not a big problem. If you install from CD-ROM you only need to use alphanumeric keys (which have the same layout on most, if not all, national keyboards) and only in a couple of places you need to press other keys. I hope that the next releases of the installation program will allow to change the keyboard layout; for the present, you can use the map in the following table.
If you use a non US keyboard, one of the first things that you will do after installation will be to change the keyboard layout. Until then, please be patient.
3.3.2. Geometries
The installation program mentions two types of hard disk geometries; you should understand what they mean:
| real geometry |
| BIOS geometry |
real geometry is the real geometry of the hard disk, detected by the system. BIOS geometry is the geometry used by the BIOS and it could be different from the real one (for example, BIOS could remap the disk using LBA).
The disk used in the installation example is an IDE disk with the following geometries:
real:  6232 cyl,   16 heads,  63 sec
BIOS:   779 cyl,  128 heads,  63 sec   (LBA)
As you can see the BIOS remaps the disk using LBA, effectively reducing the number of cylinders and increasing the number of tracks (but the result is the same: 6232 * 16 = 779 * 128 = 99712). A sector contains 512 bytes, which means that the disk size is 6232 * 16 * 63 * 512 = 3 GB. NetBSD does not need to remap the disk geometry (and in fact won't do it). During the installation it is possible to change manually the geometry if sysinst got it wrong.
3.3.3. Partitions
The terminology used by NetBSD for partitioning is different from the typical DOS/Windows terminology; in fact, there are two partitioning schemes. NetBSD installs in one of the four primary BIOS partitions (the partitions defined in the hard disk partition table).
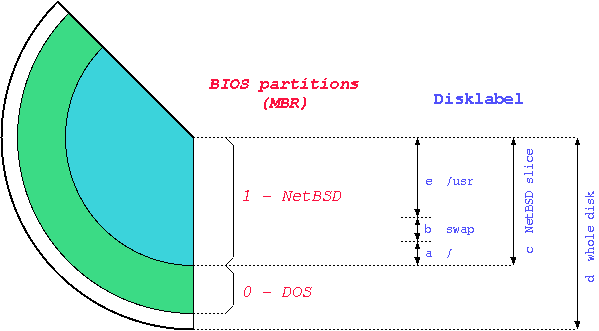
Within its BIOS partition (also called slice) NetBSD defines the BSD partitions using a disklabel: these partitions can be seen only by NetBSD and are identified by lowercase letters (starting with "a"). For example, wd0a refers to the "a" partition of the first IDE disk (wd0) and sd0a refers to the "a" partition of the first SCSI disk. In Figure 3-1 there are two primary BIOS partitions, one used by DOS and the other by NetBSD. NetBSD describes the disk layout through the disklabel.
Note: the meaning of partitions "c" and "d" is typical of the i386 port. Other ports use different conventions (e.g. "c" represents the whole disk.)
Note: if NetBSD shares the hard disk with another OS (like in the previous example) you will probably need to install a boot manager, i.e. a program which enables you to chose the OS to start at boot time. sysinst can automatically install and configure a simple but effective boot manager.
If Windows NT is installed on the same hard disk, you can use the NT bootloader to start NetBSD. An easy way to accomplish this is described on the NetBSD web site.
3.3.4. Hard disk space requirements
The space required by a NetBSD installation depends on the use that you plan to do with it (eg. server or workstation). For example, consider a home desktop system with a 420 MB hard disk (rather small by today's standards) with X, the kernel sources and some applications (Netscape, ...). The swap partition is 32 MB. df shows the following:
Filesystem  1K-blocks     Used    Avail Capacity  Mounted on
/dev/wd1a       31887    16848    13444    56%    /
/dev/wd1e      363507   173202   172129    50%    /usr
As you can see there are 180 MB left on the system.
3.3.5. Retry
When you install an OS for the first time it is seldom a success and NetBSD is no exception. Even if everything goes well, as soon as you start using the system you usually realize that (for example) you could have chosen a better layout for your partitions. It is important not to give up; if you try again you'll realize that what was difficult to understand the first time gradually becomes clearer by virtue of the accumulated experience and numerous rereads of the INSTALL document.
During the first installations it is wiser to accept the defaults suggested by sysinst and avoid, for example, changing the disklabel. The only thing that you must decide is the disk space for the NetBSD fdisk partition.
3.4. Installation example
The remaining part of this chapter deals with a real installation example for a common case: installation from CD-ROM. The concepts are the same for all types of installation (eg. ftp); the only difference is in the way the binary sets are found by sysinst. Please note that some details of the installation differ depending on the NetBSD release: this example was created with release 1.5.
For the sake of teaching, in the following example the most "difficult" options will always be chosen.
BIOS partition table full: one or more existing partitions will be deleted to make room for NetBSD.
fdisk partitioning using sectors instead of MB.
manual modification of the disklabel created by sysinst, also using sectors.
"custom" installation (meaning that you can select one by one the binary sets that you want to install).
This set of choices gives the impression that the installation is very complicated and requires a lot of work: remember that if you accept the defaults everything is much simpler. On the other hand, a tutorial which explains only the "easy" parts is not very useful (except from the marketing point of view...)
3.4.1. Preparing the installation
Before installing it is a good idea to make a detailed plan of the steps that you will need to perform. First, read the INSTALL file (I promise it's the last time that I say it) reading the description of the installation and checking the hardware compatibilities. Next, if there is already something on the hard disk, think how you can free some space for NetBSD; if NetBSD will share the disk with other operating systems you will probably need to create a new partition (which you will do with sysinst) and, maybe, to resize an existing one. It is not possible to resize an existing partition with sysinst, but there are some commercial products (like Partition Magic) and some free tools (FIPS, pfdisk) available for this.
The installation is divided logically in two steps. In the first part you create a partition for NetBSD and you write the diklabel for that partition. In the second part you decide which binary sets you want to install and extract the files in the newly created partitions. The first part is independent of the intallation method (CD-ROM, ftp, NFS, ...); at the end of the first part nothing has yet been written to the hard disk and you are prompted to confirm the installation. If you confirm, the installation goes on, else you are brought back to the main menu and the hard disk remains unchanged.
3.4.2. Creating the installation floppy
Note: if you have a bootable NetBSD CD-ROM you don't need to create an installation floppy: enable the "boot from CD-ROM" in your BIOS settings, insert the CD and reboot the machine. This option is probably not available on older machines.
Before installing you need to create the installation floppy, i.e. to copy the floppy image from the CD-ROM to a diskette. To perform this operation in DOS you can use the rawrite program in the i386/installation/misc directory. The image file is i386/installation/floppy/boot.fs.
Format the floppy.
Go to the I386\INSTALLATION\FLOPPY directory of the CD-ROM.
Run the ..\MISC\RAWRITE program. The "Source file" is BOOT.FS and the "Destination drive" is A:
If you create the boot floppy in a Unix environment, you can use the dd command. For example:
# cd i386/installation/floppy
# dd if=boot.fs of=/dev/fd0a bs=36b
dd copies blocks of 512 bytes: the bs=36b option copies 36 blocks at a time, effectively making the operation faster.
Note: a 1440K floppy contains 1474560 bytes and is made up of 80 cylinders, 2 tracks, 18 sectors and 512 bytes per sector, i.e. 80 * 2 * 18 = 2880 blocks. Thus bs=36b copies one cylinder (18 * 2 blocks) at a time and repeats the operation 80 times instead of 2880.
3.4.3. Last preparatory steps
Everything is now ready for the installation but, before beginning, it is better to gather some information on the hardware of the PC.
The most important thing to check is the type of hard disk (IDE, SCSI) and its geometry. You can find this information on the hard disk manual or using a diagnostic program. Some hard disks have a label on which this data is written. Another option is to connect to the web site of the producer of your disk and look for the product info.
If you install via ftp or NFS remember to check your network card settings: if the installation kernel expects your card to be on an IRQ but the card's settings are different you won't be able to install. For example, the install kernel can recognize an NE2000 compatible network card with one of the following two settings:
ne0     at isa? port 0x280 irq 9        # NE[12]000 ethernet cards
ne1     at isa? port 0x300 irq 10
If your NE2000 network card has different settings it will not be detected. (After the installation you will be able to compile a customized kernel with your own settings.)
While you are at it you should check some other hardware details like, for example, the number of serial and parallel ports, etc.; this is not required for installation but it can turn out useful later. Check your settings (IRQ, I/O ports, ...) against the ones written in the INSTALL file.
Note: you can install even if you don't know the hard disk geometry as well as any of the other details. In this case you must trust sysinst, which automatically determines the geometry and (usually) gets it right.
3.4.4. Beginning the installation
Insert the newly created installation floppy in drive A: and reboot the computer (or boot from CD-ROM). The kernel on the floppy is booted and starts displaying a lot of messages on the screen, most of which say something about hardware not being found or not being configured. This is normal: the kernel on the floppy tries to detect almost all the hardware supported by NetBSD; you probably (!) don't have all these devices in your machine.
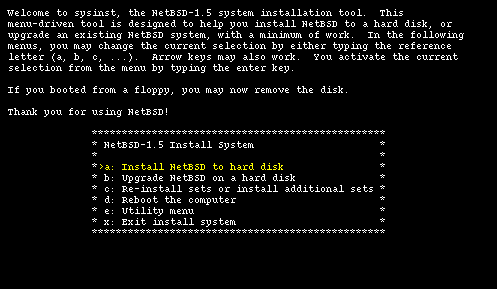
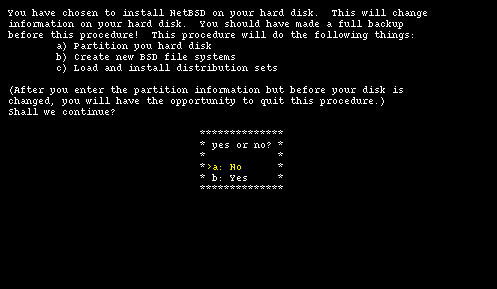
When the boot procedure is over you will find yourself in the main menu of the installation program, shown in Figure 3-2. Don't be deceived by the spartan look of sysinst: it is a rather powerful and flexible program. From here on you should follow the instructions displayed on the screen, using the INSTALL document as a reference. The sysinst screens all have more or less the same layout: the upper part of the screen shows a short description of the current operation or a short help message; the central part of the screen shows the current settings as detected by NetBSD; the bottom part displays a menu of available choices. Choosing the Install option ("a") brings you to the next screen (Figure 3-3) where you confirm the operation.
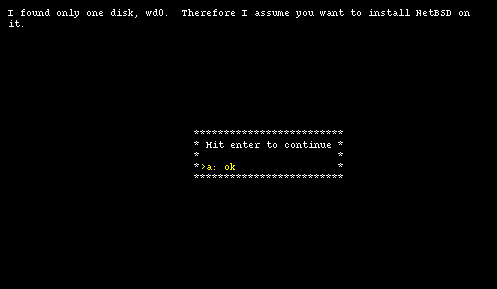
After choosing to continue with option "b", it is time to select on which hard disk you want to install NetBSD. If more than one disk is available, sysinst displays a list of disks from which you can pick one. In this example there is only one hard disk and the installation program only displays an informational message, shown in Figure 3-4.
Note: the information in this screen will be different depending on the type and number of hard disks installed on the system.
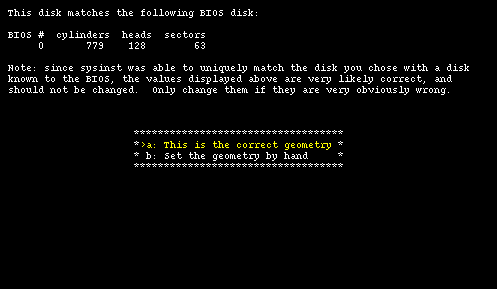
Next (Figure 3-5) sysinst displays the BIOS geometry for the chosen disk; you can confirm that it is correct or, if the installation program got it wrong, you can modify it by entering new values manually.
3.4.5. Partitions
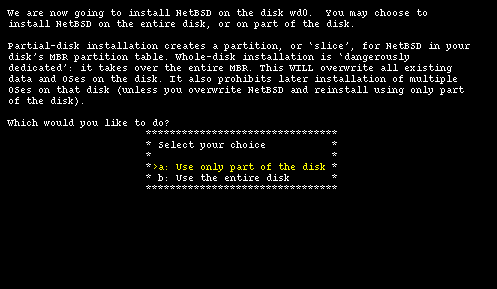
The first important step of the installation has come: the partitioning of the hard disk. First you must specify if NetBSD will use a partition (suggested choice) or the whole disk ("dangerous" choice). In the former case it is still possible to create a partition that uses the whole hard disk (Figure 3-6) so I recommend to select this option which, if I understand correctly, keeps the BIOS partition table in a format compatible with other operating systems.
In the this example we will use a disk with the following "real" geometry, corresponding to the BIOS geometry of Figure 3-5.
6232 cyl, 16 heads, 63 sec  (6232 x 16 x 63 = 6281856 total sectors)
1 sector = 512 bytes
1 track = 63 sectors = 63 * 512 bytes = 32 K
1 cylinder = 16 * 63 * 512 bytes = 504 K
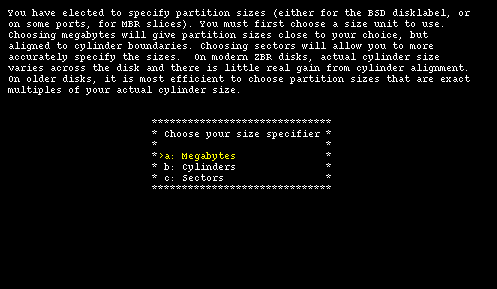
The next step, depicted in Figure 3-7, is the selection of a unit of measure to be used for hard disk partitioning: sectors give the most flexibility and precision (note that it is usually better to align partition on cylinder boundaries for performance reasons, at least on older hard disks.) Megabytes are easier to use because they don't require manual calculations and are more "intuitive".
This tutorial will use sectors because they are more useful for teaching purposes. Chosing option "c" you are taken to the fdisk interface screen.
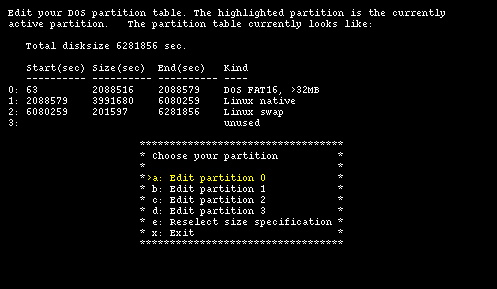
Figure 3-8 shows the current situation of the hard disk before the installation of NetBSD; there are four primary partitions: one is used by DOS/Windows and two by GNU/Linux; the last one is unused. There is no free space on the disk: the End(sec) column of partition 2 shows that the 6281856 sectors of the hard disk are all occupied.
Note: in the fdisk screen the following formula holds:
Start(sec) + Size(sec) = End(sec)This means that the End(sec) column of a partition is equal to the Start(sec) column of the following partition, which is not very intuitive because the sector in the End(sec) column of a partition actually belongs to the following one. Disklabel will use a different (and more logical) convention.
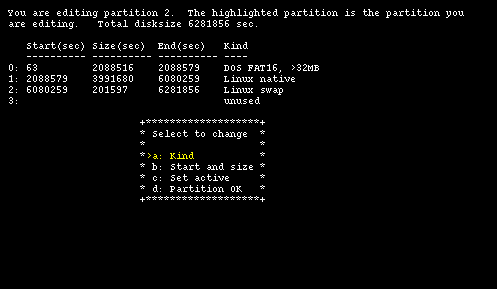
To make room the two Debian GNU/Linux partitions will have to sacrificed, starting with the last one. Sysinst displays a screen that can be used to modify the existing data for a partition and Figure 3-9 shows the current data for partition 2.
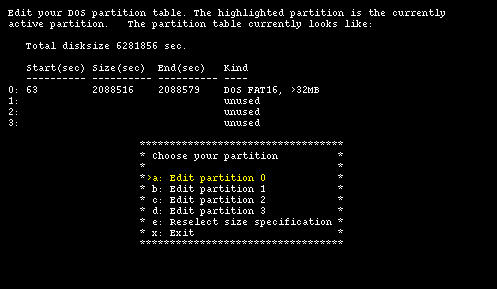
To delete the partition, select type unused using option "a" and than choose option "b" leaving the fields "Start" and "Size" empty (press Enter leaving the fields blank). Finally, confirm everything with option "d" and you are back in the main fdisk screen, where partition 3 is now empty. Use the same method to delete partitions 2 and 1, leaving only partition 0 on the disk (Figure 3-10.)
Only the DOS/Windows partition is left, using 2088516 sectors which are equal to 1029 MB (about 1 GB). The free space is calculated as the difference between the already calculated total number of sectors and the end sector of the DOS partition (the number in the End(sec) column.)
6281856 - 2088579 = 4193277 sectors = 2047 MB free on disk
Note: the DOS partition begins at sector 63 and not at sector 0 as you could expect. This is not unusual: the first track (63 sectors) is reserved. At cylinder 0, track 0, sector 1 of the hard disk there is the Master Boot Record (MBR). When the system is booted the BIOS loads the MBR in memory from the hard disk, detects which partition is active and loads in memory the boot sector of that partition, to which it yields control. The boot sector, then, starts the operating system on his partition.
Now, using option "b", a new partition for NetBSD will be created, starting at the end of the DOS partition. To create a new partition the following information must be supplied:
the type of the new partition
the first sector of the new partition
the size (in sectors) of the new partition
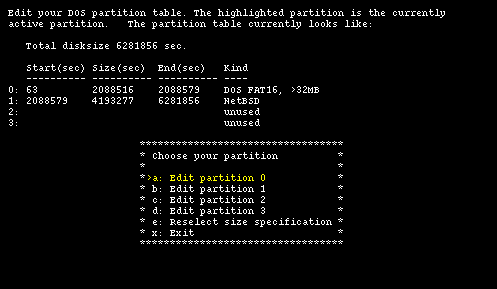
Choose the partition type "NetBSD" for the new partition (option "a: Kind") and input the data that we have calculated: start = 2088579 and size = 4193277 using option "b". Check that everything is correct and confirm the creation with option "d", which brings you back to the main fdisk menu. The result is shown in Figure 3-11 which displays the final layout of the partition table. Now, selecting option "x" you proceed to the next menu.
Note: sysinst for NetBSD 1.5 checks the start and end sectors of the unused partitions too, even though you can't see this information on the screen. Thus it can happen that the program issues a warning about overlapping partitions even if everything looks correct on the screen. I suggest to correctly define the start and size of the unused partitions.
If you have made an error in partitioning (for example you have created overlapping partitions) sysinst will display a message and suggest to go back to the fdisk menu (you are also allowed to continue). If the data is correct but the NetBSD partition lies outside the range of sectors which is bootable by the BIOS, sysinst warns you and asks if you want to proceed anyway. This could lead to problems on older PC's: the PC used in the example received this warning but boots perfectly. It is not possible to give a general rule (it is BIOS dependent); if the PC is not very old I suggest to ignore the warning and continue.
Note: this is not a limitation of NetBSD; some old BIOSes cannot boot a partition which lies outside the first 1024 cylinders. To understand fully the problem you should study the different type of BIOSes and the many addressing schemes that they use (physical CHS, logical CHS, LBA, ...). These topics are not described in this guide.
With the most recent BIOS, supporting int13 extensions, it is possible to install NetBSD in partitions that live outside the first 8 GB of the hard disk, provided that the NetBSD boot selector is installed.
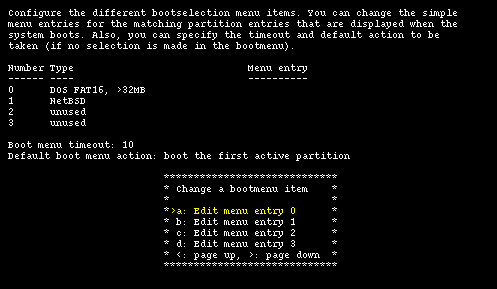
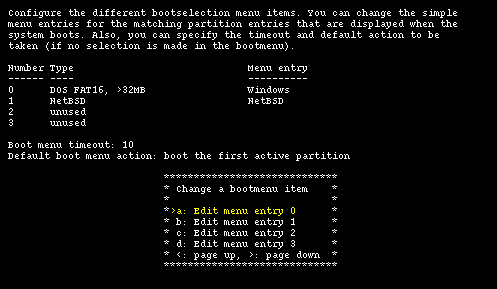
If the data is correct and sysinst detects that you have more than one operating system on your hard disk, it will offer to install a boot selector on the hard disk. Using the installation program you can both install the boot selector and configure it; you can specify what strings will be displayed on the boot menu for each operating system, which partition is booted by default and the timeout used when the user does not select anything. This screen is shown in Figure 3-12.
Note: if the arrow keys don't work you can scroll the menu options using the < and > keys.
Select the partitions that will appear in the boot manager menu and define a menu item string for each one using the options from "a" to "d". In the "Menu entry" column you should see an entry for each bootable partition, as shown in Figure 3-13.
Option "e" enables you to choose a timeout for the boot menu: once the timeout is elapsed without a choice from the user, the default partition (defined with option "f") is booted. You can specify one of the following as default:
a partition
another hard disk
the first active partition
After finishing the boot manager configuration, the first part of the installation, namely disk partitioning, is over.
The BIOS partitions, also called slices by BSD, have been created; there are now two slices: DOS and NetBSD. It's time to define the BSD partitions.
3.4.6. Disklabel
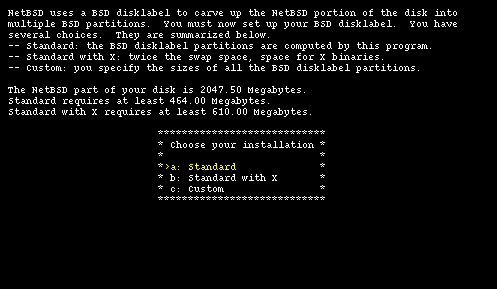
There are three alternatives for the creation of the BSD partitions, as shown by Figure 3-14.
For a first time installation I suggest choosing options "a" or "b" and leaving to sysinst the partitioning decisions. In this example life will be a little more complicated by modifying manually the disklabel (only for teaching purposes, of course).
Note: even if you let the system decide for you, it is still better to examine carefully the generated disklabel. If the disk space is insufficient the 1.5 sysinst is smart enough to detect it and issue a warning; previous versions of the installer didn't and silently created invalid partitions.
3.4.7. Creating a disklabel
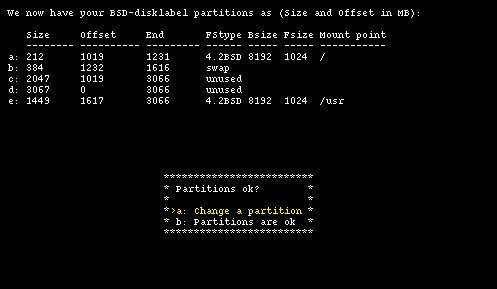
First, let the installation program automatically create a disklabel. Choosing option "b" from Figure 3-14 we are taken to Figure 3-15.
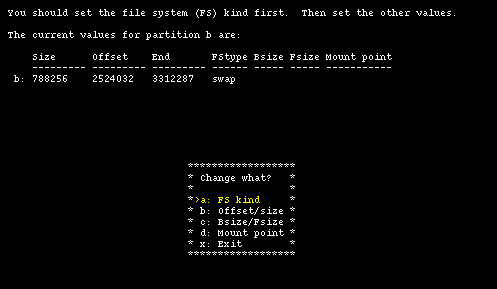
Having done this you could just confirm everything (with option "b") and your work would be over. Instead, let's see what you need to do to modify the size of the swap partition to make it smaller and increase the size of the /usr partition. To change the size of the swap partition, choose option "a": in the new screen we change the unit of measure to sectors. The result is shown in Figure 3-16.
The sequence of partition identifiers is standard: some letters are reserved for predefined uses.
a is usually the root partition.
b is the swap partition.
c covers the whole NetBSD slice.
d covers the whole hard disk: extending outside the NetBSD slice. With a similar method you will be able to make a DOS or a Linux partition visible to NetBSD, by creating a BSD partition which is outside the NetBSD slice.
e is the first free partition. Usually /usr is mounted on "e".
Note: the meaning of a partition id can differ from port to port. The preceding description applies to port-i386.
You normally don't want to modify partitions b and c. You are free to change the size and mount point of the remaining partitions and to create new ones (with a maximum of 8, using the letters from e to h.)
To modify the swap partition you need to modify partition b. You will also need to modify partition "e", so that it begins right after the end of "b". Partitions "c" and "d" will be left unchanged.
You will now create a 150 MB (307200 sectors) swap partition; this means that "b" will start at sector 2524032 and end at sector 2831231 (2524032+307200-1).
id:      Size    Offset       End FStype Bsize Fsize Mount point
---      ----    ------       --- ------ ----- ----- -----------
 a:    435453   2088579   2524031 4.2BSD  8192  1024 /
 b:    307200   2524032   2831231   swap
 ...
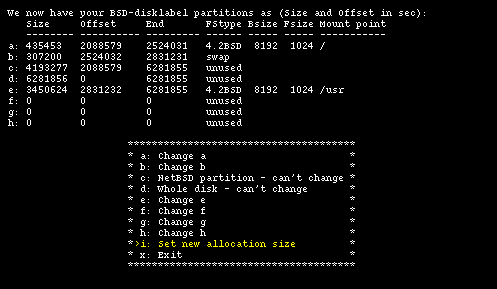
The newly freed space will be assigned to partition "e", which will have: start = 2831232, size = 3450624 and end = 6281855. These values have been calculated as follows: "start" is the sector immediately following the end sector of partition "b"; "end" is equal to the last sector of the NetBSD partition; "size" is given by: End - Offset + 1.
id:      Size    Offset       End FStype Bsize Fsize Mount point
---      ----    ------       --- ------ ----- ----- -----------
 a:    435453   2088579   2524031 4.2BSD  8192  1024 /
 b:    307200   2524032   2831231   swap
 ...
 e:   3450624   2831232   6281855 4.2BSD  8192  1024 /usr
The preceding example shows the disklabel that you want. With option "b" and "e" you can input the data that you have calculated.
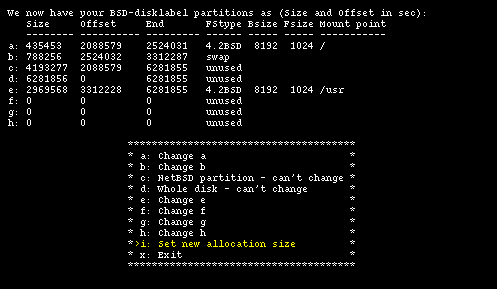
This is depicted in Figure 3-17.
Figure 3-18 shows the modified disklabel.
Partition sizes: it is very difficult to give a general rule to decide how many partitions you should create and their best sizes: this depends on the intended usage of the computer (server, workstation, mail server, ...). This is why I recommend, for a first time installation, to stick with the sysinst generated defaults. A complex server will probably need a more sofisticated partitioning; those who deal with this type of problems will also know the answers.
When you are happy with the result, you can select option "x" to save and exit. You are now back in Figure 3-15 where you can choose option "b".
3.4.8. Final operations
The difficult part (creating the BIOS and the BSD partitions) is now over; the remaining part of the installation is much simpler. Now you can choose a name for the hard disk (the default name is mydisk) and confirm the operations that you have done.
Note: all that was done until now has not yet been committed to disk: it is still possible to change your mind and go back to the main sysinst menu leaving the disk unchanged.
sysinst will now create the partitions and the file systems with fdisk, newfs, fsck and installboot and then we will install the NetBSD sets.
3.4.9. Choosing the installation media
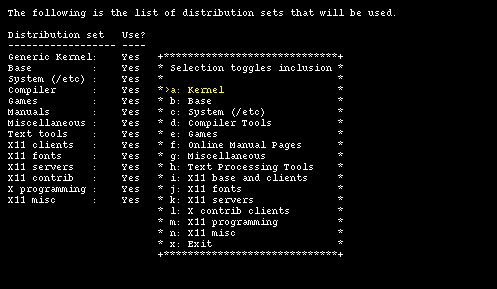
You have finished the first and most difficult part of the installation. In the next step you will choose the type of installation, which can be full, which installs all the sets, or custom, which enables you to choose the sets to be installed. If you don't have a shortage of space on the hard disk I suggest to choose the former option. In this example option custom will be used only to show what it looks like. This brings you to Figure 3-19.
The first three sets are mandatory: without them the system can't work. You can toggle the installation of the remaining sets using the menu options. Initially all sets are selected for installation, which is the same as the aforementioned full option. Leave all the sets on and proceed to the next step with option "x: Exit".
sysinst then asks if you want to see filenames during the extraction from the sets.
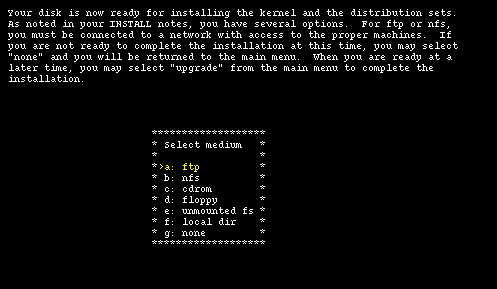
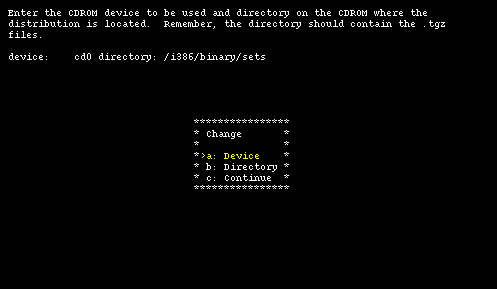
Now sysinst needs to find the NetBSD sets (the .tgz files) and you must supply this information. The menu offers several choiches:
The options are explained in detail in the INSTALL document. It is also possible to install from an unmounted filesystem (provided that it is of a type recognised by the install kernel): this means that, for example, it is possible to copy all the sets to an existing MS-DOS partition and install from there.
Selecting "cdrom", sysinst asks the name of the device (for example cd0) and mounts it automatically. You should also input the pathname to the installation sets on the CD-ROM if it is different from the default value. If, for example, the NetBSD distribution is in the NetBSD-1.5 directory you must modify the pathname, using option "b", like this:
/NetBSD-1.5/i386/binary/sets
Note: if you are using a non US keyboard you'll have to be careful when you type the "/" character. See Section 3.3.1.
The CD-ROM device name: if you don't know the name of the CD-ROM device, you can find it in the following way:
Press Ctrl-Z to pause sysinst and go to the shell prompt (that's a nice feature!)
Type the command:
# cat /kern/msgbufThis will show the kernel startup messages, including the name of the CD-ROM device (for example cd0).If the display scrolls too quickly, you can also use the ed editor.
# ed /kern/msgbufGo back to the installation program with the command:
# fg
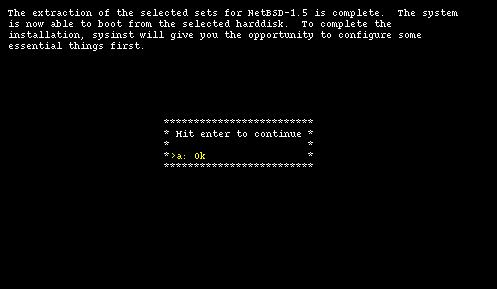
At the end of the installation sysinst displays a message saying that everything went well. Selecting option "a: ok" the device files are created.
The installation is over. Sysinst can now do some system configuration before rebooting. First you can configure the timezone and, in the following screen, you can choose a password for root. Now it's tiem to reboot. Select "a: ok" and go back to the main menu, then remove the floppy from the drive and select option "d: Reboot the computer".
